Electronics
Related to electronics and Arduino projects.

[Prototype] Cloud-enabled blood pressure monitor

Posted by Tobias on 2015-11-08 at 8:08 pm


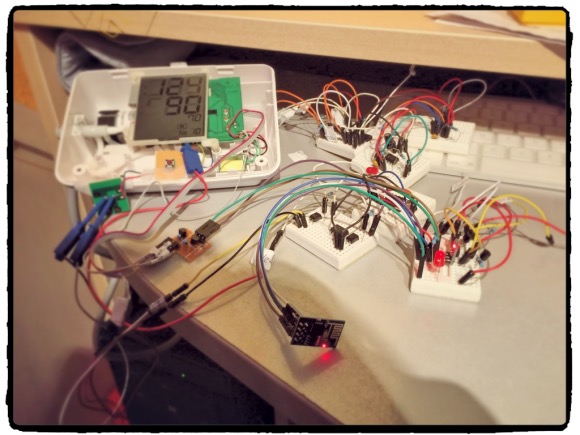
Cloud-enabled blood pressure monitor prototype

Why would anyone hack a blood pressure monitor?! Well, the reason for me was simple: I found a similar project online and I thought, this might be something for myself. For persons with high blood pressure it's important to keep track on the blood pressure as often as possible. The struggle is keeping the measurement results permanently. Of course you can note them down on a piece of paper or put it into a spreadsheet on your computer but to be honest, nobody does this longer than a few days. Everything which has to be done manually is not easy and simple enough. This needs to be improved!

The basic idea of this "cloud-enabled" blood pressure monitor is to have an automatically generated list with all your measurement results. This list is accessible from anywhere, so if you do not have a printed version with you (at your doctors appointment), just use your mobile phone and browse to your cloud to get the most recent results.

Yeah that's fancy but why uploading health data to a cloud service? What about privacy? Don't worry, if you read the word "cloud" in such a topic. A cloud can be any web service with some kind of data storage behind. Nobody forces you to use a public cloud service such as data.sparkfun.com. Feel free to use your own web server or home automation software. I'm also not planning to upload my health data to any public cloud but to my local FHEM home automation system. This system will store all my measurements and generate some nice graphics for my next doctors appointment. And this time I'll be prepared for the question "Did you check your blood pressure at home?"!

Currently the project is not yet completely finished. The prototype is ready as you can see in the picture above. The project itself is based on two microcontrollers. An ESP8266 is handling all the internet stuff such as uploading measurement results as well as communicating with the blood pressure monitor. Additionally, there is an ATTiny85 which is taking care to force upload a measurement result directly after the result is shown on the LC-Display.

Of course, once the project is completely implemented, there will be a video and a documentation on how I built this. Thanks so far for your interest.

And by the way, you may have recognized that this is the first post in English on my page. I'm sorry for all my German visitors, but to reach more readers I'll slowly switch more and more to English on my blog. Since my English is not the best one, I guess also German readers should be able to understand my posts. Thanks for your understanding!

HackingElectronics | 2 comments

FritzBox CallMonitor - Teil 3: Software

Posted by Tobias on 2015-11-02 at 9:20 pm

Aller guten Dinge sind drei! Mit diesem dritten Teil wird die Serie zum FritzBox CallMonitor Nachbau abgeschlossen. Sämtliche elektronischen Komponenten, die für den CallMonitor nötig sind, wurden bereits in Teil 1 ausführlich behandelt und deren Zusammenstellung u.a. im Video erklärt. Teil 2 beschäftigte sich mit dem Aussehen des CallMonitors. Hier wurde ein Plastik-Gehäuse entsprechend modifiziert.

Was noch fehlt ist die eigentliche Software bzw. der Quellcode, der auf dem Mikrocontroller läuft und sozusagen das Gehirn des Gerätes darstellt.

Read more...
Electronics | 3 comments

FritzBox CallMonitor - Teil 2: Gehäuse

Posted by Tobias on 2015-10-25 at 7:58 pm

Im zweiten Teil meiner FritzBox CallMonitor Serie geht es um den Einbau der Elektronik aus Teil 1 in ein Plastik-Projektgehäuse. Es wird ein Plastikgehäuse benötigt, welches groß genug ist, um sämtliche Elektronik-Komponenten zu beinhalten. Dieses Gehäuse muss jetzt enstsprechend bearbeitet werden, bevor die Elektronik-Komponenten eingesetzt werden können.

Read more...
Electronics | No comments

FritzBox CallMonitor - Teil 1: Elektronik

Posted by Tobias on 2015-10-24 at 11:58 pm

Mein Projekt "FritzBox CallMonitor" hat im "Pimp your Fritz!" Wettbewerb den ersten Platz gemacht. Aufgrund der vielen Anfragen möchte ich hiermit die Baudokumentation und auch Video zum Projekt veröffentlichen. Der CallMonitor kann somit von Jedermann einfach nachgebaut werden. Im diesem Teil 1 der Baudokumentation für meinen FritzBox CallMonitor ist zunächst einmal der Elektronik-Teil beschrieben. Zusätzlich zum Video oben gibt es auf dieser Seite jeden einzelnen Schritt nochmals detailliert erklärt. Im folgenden zweiten Teil geht es dann um die Anpassung und Einbau des Gehäuses und im letzten Teil um den Quellcode. Viel Spaß beim Nachbau!

Read more...
Electronics | 3 comments

1. Platz im AVM/Make Wettbewerb "pimp your fritz"

Posted by Tobias on 2015-09-23 at 12:50 pm

Ich kann es noch gar nicht glauben! Ich habe also tatsächlich den ersten Platz im "pimp your fritz" Wettbewerb von AVM/Make gemacht. Vielen herzlichen Dank an alle Unterstützer und Abstimmer!

Aufgrund der Fragen zu meinem Projekt "CallMonitor" hier nur in Kürze das Wichtigste:

  • Das Projekt selbst wird in Kürze hier mit einer ausführlichen Bauanleitung vorgestellt
  • Auf meinem YouTube Channel gibt es in Kürze dazu ein detailiertes Video

Nochmals vielen Dank!

Real-LifeElectronics | 6 comments
← Previous
Next →